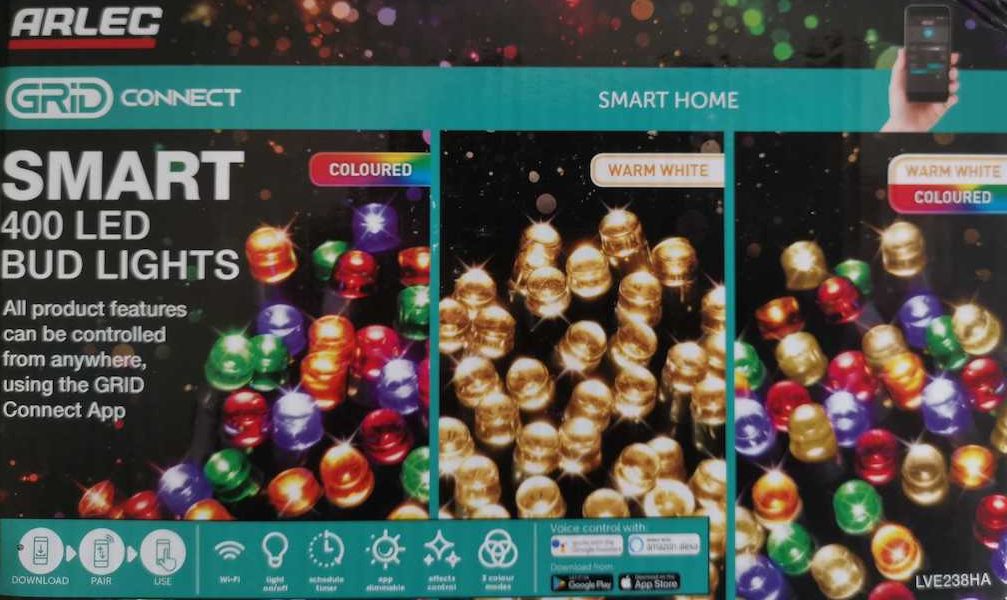
I’m loving the wide array of electrically certified home automation devices we’re seeing now. Light bulbs, sensors, power boards, and even Christmas lights. Specifically Arlec is shipping these app controllable Christmas lights this year, which looked very much like they should work with Tasmota.

(Sorry for the terrible product picture, I can’t find this product online any more, I suspect Bunnings has sold out for the year?)
Specifically, it turns out that these Arlec lights are an ESP8266 which can be flashed with tuya-convert v2 to run tasmota. Once flashed, you can control all of the functions available on the device itself, although there are parts of the protocol I haven’t fully understood yet.
Let’s start off by flashing the device:
- First off boot your raspberry pi with tuya-convert. I used v2, and I suspect that’s important here so make sure you upgrade if you’re using something old.
- Next, put the bud lights into programming mode by holding the button on the control box down until the light strand turns off. Release and the strand should start blinking every couple of seconds.
- Now run the tuya-convert flashing script.
- Now go to the tasmota-XXXX essid and enter your wifi details into the captive portal. The light strand will now reboot.
- The light strand should now appear on your wifi, and you can find the IP address and MAC address by asking your DHCP server nicely.
Now for some basic configuration in the web UI. Set the module type to “Tuya MCU (54)”, GPIO1 to “Tuya Tx (107)”, and GPIO3 to “Tuya RX (108)”. You’ll also want to set the usual site-specific configuration options like your MQTT server and so forth.
So what is a “Tuya MCU” when it is at home? Well, it turns out that some tuya devices have an esp8266 which just talks serial to another microcontroller. It kind of makes sense if you already have a microcontroller device you want to make “smart” and you’re super dooper lazy I suppose. There is surprisingly good manufacturer documentation online.
In the case of these bud lights, I have a strong theory that we can basically cycle the modes available by pressing the physical button, but I needed a way to validate that.
You can read more about how these devices work on the tuya protocols page, or you can just jump ahead to the simple programs I wrote to explore these devices. However, a quick summary of the serial protocol spoken between the esp8266 and the MCU is helpful. Packets look like this:
- Frame header: fixed 2 byte value 0x55aa
- Version: 0x00
- Command word: a byte
- Data length: 2 bytes
- Function length: 2 bytes
- Function command: 1 byte
- Checksum: 1 byte
First off I wrote a simple program to monitor the state of the device registers (called dpIds for “define product ids”). It just uses the tasmota web console to constantly ask for the current state of the dpIds (“SerialSend5 55aa0001000000”, a hard coded MCU control packet) and prints out any changes. Note that for it to work, the web console log level needs to be set to debug.
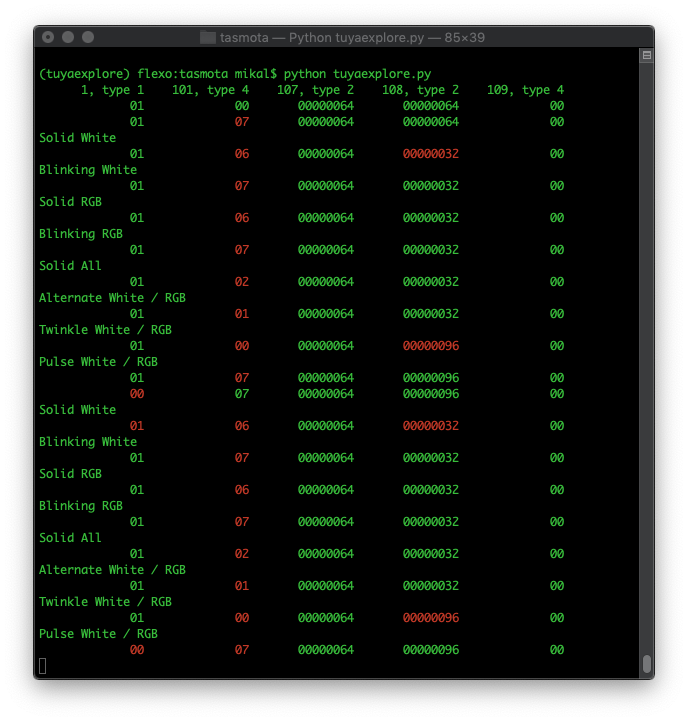
Now I can press the button on the device and see what dpIds change. A session looked like this (the notes like “solid white” are things I typed into the terminal as I went):

Clearly dpId 1 (type 1, a boolean) is the power state with 0 being off and 1 being on. This is also easily testable of course. If you send a “TuyaSend1 1,0” to the device using the web console it turns off, and if you send “TuyaSend1 1,1” it turns on. This assignment also maps to the way other Tuya MCU devices are configured, so it seems like a very safe assumption.
dpId 101 (type 4, 1 byte enum) seems to be the mode, walking through the possible values determined:
- 0: fast pulse
- 1: twinkle
- 2: alternate
- 3: alternate differently
- 4: alternate and cause epileptic fits
- 5: double alternate
- 6: flash
- 7: solid
- 8: off
- 9 onwards: brief all
dpId 107 (type 2, 4 byte value) wasn’t changable via the physical button, so I wrote another simple script to send a bunch of values to it. It appears to be a brightness control for the white LEDs, with 0 being off and 99 being fully on. I haven’t managed to find a brightness control for the coloured LEDs. The brightness control also doesn’t appear to work in all modes.
dpId108 (type 2, 4 byte value) remains a mystery to me at this time. It doesn’t seem to change regardless of what values I send it.
dpId 109 (type 4, 1 byte enum) seems to be which strand is on. A value of 0 is just white LEDs, 1 is just coloured LEDs, 2 is all LEDs, and 3 is all LEDs but dimmer.
It sort of doesn’t matter that I haven’t fully decoded the inner workings of the device, because this is enough information for my use case. All I really want is for all the lights to be on solidly (that is, with no blinking). This is because I use them for lighting under my back pergola and the blinking would be quite annoying.
So how do you wire up Home Assistant to send serial packets to a slave MCU over MQTT? Home Assistant will already control the lights turning on and off because of the default relay implementation for dpId 1. What I need to be able to do is turn on all the lights in a solidly on configuration. For that, I can implement rules like:
>> Rule1
ON Event#0 DO TuyaSend4 101,0 ENDON
ON Event#1 DO TuyaSend4 101,1 ENDON
ON Event#2 DO TuyaSend4 101,2 ENDON
ON Event#3 DO TuyaSend4 101,3 ENDON
ON Event#4 DO TuyaSend4 101,4 ENDON
ON Event#5 DO TuyaSend4 101,5 ENDON
ON Event#6 DO TuyaSend4 101,6 ENDON
ON Event#7 DO TuyaSend4 101,7 ENDON
ON Event#8 DO TuyaSend4 101,8 ENDON
ON Event#9 DO TuyaSend4 101,9 ENDON
>> Rule1 ON
>> Rule2
ON Power1#state=1 DO TuyaSend1 1,1 ENDON
ON Power1#state=1 DO TuyaSend4 109,2 ENDON
>> Rule2 ONYou apply this rule by pasting it into the web console on the device. Note that there are four separate pasted commands. Rule1 exposes the modes from dpId101 as effects in Home Assistant, and Rule2 hooks to the power on MQTT command to ensure that the lights are set to solidly on via dpId 109.
The matching Home Assistant configuration looks like this:
# Arlec fairy lights on the back deck
- platform: mqtt
name: "Back deck 1"
command_topic: "cmnd/sonoff14/POWER"
state_topic: "tele/sonoff14/STATE"
state_value_template: "{{value_json.POWER}}"
availability_topic: "tele/sonoff14/LWT"
effect_command_topic: "cmnd/sonoff14/Event"
effect_list:
- 0
- 1
- 2
- 3
- 4
- 5
- 6
- 7
- 8
- 9
payload_on: "ON"
payload_off: "OFF"
payload_available: "Online"
payload_not_available: "Offline"
qos: 1
retain: falseThis gives me the ability to turn the fairy lights on and off via Home Assistant, and ensure they they’re solidly on and not blinking. That’s good enough for now.
Did you end up making any further progress on this or are you just happy with how it is? I saw these in Bunnings today and found this page when looking to see if they can be flashed. I already have some Mirabella lights which seem very similar so I’m thinking of trying this on those.
Could you please tell me (since I didn’t open the pack at Bunnings) are the lights using just two wires from the controller?
Hi, I have some tuya lights for Christmas and maybe you can help me out. They are not RGB though just WW 2 strings twisted and I’d like to flash tasmota on the chip.
https://www.action.com/nl-nl/p/dummy-3006847/