I’ve been working on a RFID scanner than can best be described as an overly large Raspberry Pi HAT recently. One of the things I am grappling with as I get closer to production boards is that I need to be able to identify what version of the HAT is currently installed — the software can then tweak its behaviour based on the hardware present.
I had toyed with using some spare GPIO lines and “hard coded” links on the HAT to identify board versions to the Raspberry Pi, but it turns out others have been here before and there’s a much better way. The Raspberry Pi folks have defined something called the “Hardware On Top” (HAT) specification which defines an i2c EEPROM which can be used to identify a HAT to the Raspberry Pi.
There are a couple of good resources I’ve found that help you do this thing — sparkfun have a tutorial which covers it, and there is an interesting forum post. However, I couldn’t find a simple tutorial for HAT designers that just covered exactly what they need to know and nothing else. There were also some gaps in those documents compared with my experiences, and I knew I’d need to look this stuff up again in the future. So I wrote this page.
Initial setup
First off, let’s talk about the hardware. I used an 24LC256P DIL i2c EEPROM — these are $2 on ebay, or $6 from Jaycar. The pins need to be wired like this:
| 24LC256P Pin | Raspberry Pi Pin | Notes |
| 1 (AO) | GND (pins 6, 9, 14, 20, 25, 30, 34, 39) | All address pins tied to ground will place the EEPROM at address 50. This is the required address in the specification |
| 2 (A1) | GND | |
| 3 (A2) | GND | |
| 4 VSS | GND | |
| 5 SDA | 27
You should also add a 3.9K pullup resistor from EEPROM pin 5 to 3.3V. |
You must use this pin for the Raspberry Pi to detect the EEPROM on startup! |
| 6 SCL | 28
You should also add a 3.9K pullup resistor from EEPROM pin 6 to 3.3V. |
You must use this pin for the Raspberry Pi to detect the EEPROM on startup! |
| 7 WP | Not connected | Write protect. I don’t need this. |
| 8 VCC | 3.3V (pins 1 or 17) | The EEPROM is capable of being run at 5 volts, but must be run at 3.3 volts to work as a HAT identification EEPROM. |
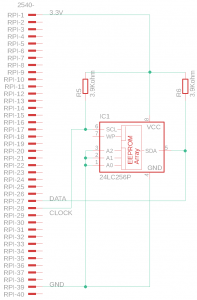
The specification requires that the data pin be on pin 27, the clock pin be on pin 28, and that the EEPROM be at address 50 on the i2c bus as described in the table above. There is also some mention of pullup resistors in both the data sheet and the HAT specification, but not in a lot of detail. The best I could find was a circuit diagram for a different EEPROM with the pullup resistors shown.
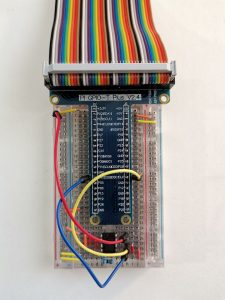
My test EEPROM wired up on a little breadboard looks like this:

And has a circuit diagram like this:

Next enable i2c on your raspberry pi. You also need to hand edit /boot/config.txt and then reboot. The relevant line of my config.txt look like this:
dtparam=i2c_vc=onAfter reboot you should have an entry at /dev/i2c-0.
GOTCHA: you can’t probe the i2c bus that the HAT standard uses, and I couldn’t get flashing the EEPROM to work on that bus either.
Now time for our first gotcha — the version detection i2c bus is only enabled during boot and then turned off. An i2cdetect on bus zero wont show the device post boot for this reason. This caused an initial panic attack because I thought my EEPROM was dead, but that was just my twitchy nature showing through.
You can verify your EEPROM works by enabling bus one. To do this, add these lines to /boot/config.txt:
dtparam=i2c_arm=on
dtparam=i2c_vc=onAfter a reboot you should have /dev/i2c-0 and /dev/i2c-1. You also need to move the EEPROM to bus 1 in order for it to be detected:
| 24LC256P Pin | Raspberry Pi Pin | Notes |
| 5 SDA | 3 | |
| 6 SCL | 5 |
You’ll need to move the EEPROM back before you can use it for HAT detection.
Programming the EEPROM
You program the EEPROM with a set of tools provided by the raspberry pi folks. Check those out and compile them, they’re not packaged for raspbian that I can find:
pi@raspberrypi:~ $ git clone https://github.com/raspberrypi/hats
Cloning into 'hats'...
remote: Enumerating objects: 464, done.
remote: Total 464 (delta 0), reused 0 (delta 0), pack-reused 464
Receiving objects: 100% (464/464), 271.80 KiB | 119.00 KiB/s, done.
Resolving deltas: 100% (261/261), done.
pi@raspberrypi:~ $ cd hats/eepromutils/
pi@raspberrypi:~/hats/eepromutils $ ls
eepdump.c eepmake.c eeptypes.h README.txt
eepflash.sh eeprom_settings.txt Makefile
pi@raspberrypi:~/hats/eepromutils $ make
cc eepmake.c -o eepmake -Wno-format
cc eepdump.c -o eepdump -Wno-formatThe file named eeprom_settings.txt is a sample of the settings for your HAT. Fiddle with that until it makes you happy, and then compile it:
$ eepmake eeprom_settings.txt eeprom_settings.eep
Opening file eeprom_settings.txt for read
UUID=b9e3b4e9-e04f-4759-81aa-8334277204eb
Done reading
Writing out...
Done.And then we can flash our EEPROM, remembering that I’ve only managed to get flashing to work while the EEPROM is on bus 1 (pins 2 and 5):
$ sudo sh eepflash.sh -w -f=eeprom_settings.eep -t=24c256 -d=1
This will attempt to talk to an eeprom at i2c address 0xNOT_SET on bus 1. Make sure there is an eeprom at this address.
This script comes with ABSOLUTELY no warranty. Continue only if you know what you are doing.
Do you wish to continue? (yes/no): <strong>yes</strong>
Writing...
0+1 records in
0+1 records out
107 bytes copied, 0.595252 s, 0.2 kB/s
Closing EEPROM Device.
Done.Now move the EEPROM back to bus 0 (pins 27 and 28) and reboot. You should end up with entries in the device tree for the HAT. I get:
$ cd /proc/device-tree/hat/
$ for item in *
> do
> echo "$item: "`cat $item`
> echo
> done
name: <strong>hat</strong>
product: <strong>GangScan</strong>
product_id: <strong>0x0001</strong>
product_ver: <strong>0x0008</strong>
uuid: <strong>b9e3b4e9-e04f-4759-81aa-8334277204eb</strong>
vendor: <strong>madebymikal.com</strong>Now I can have my code detect if the HAT is present, and if so what version. Comments welcome!